How to Setup Hardware-Accelerated Streaming in Plex with Intel Quick Sync on Unraid
Dec 4, 2020
I am not going to go in depth about what Hardware Accelerated Streaming is, but this will be a quick guide on how to implement it if you have a compatible Intel CPU. Here is a quick snippet Plex Support explaining it:
To convert videos faster and with less processing power, you can turn on Hardware-Accelerated Streaming in Plex Media Server. When hardware acceleration is turned on, Plex Media Server will use the dedicated video decoder and encoder hardware support in your computer/device to convert videos, letting you stream HD or 4K video more smoothly and stream to more devices at once. And if you use the same computer for both work and play, hardware acceleration uses less processing power during video streaming, giving you back the speed you need.
If you’re familiar with Plex and Unraid, feel free to skip straight to the TL;DR at the bottom.
Requirements
There are 3 requirements for this set up.
- Plex Pass — Hardware Accelerated Streaming is a paid Plex Pass only feature
- Quick Sync Capable CPU — Your CPU must contain Intel’s Quick Sync Video core. Most newer Intel CPUs should have this, with varying capabilities for which video codecs they can transcode.
- A compatible motherboard — If your motherboard has video out ports on it and you set up your server with the onboard graphics you should have no problems here. However, in some cases there must be a video cable plugged into your machine for this to work and if you want to run your server without having it connected to a monitor, you’ll have to use some kind of HDMI display emulator dongle. In my case, I did not need one of these so wait until the end to see if you do.
To see if you have a compatible CPU, check this table from wikipedia:
— Intel Quick Sync Video: Hardware decoding and encoding | Wikipedia
Setup Driver
Once you know you have a compatible CPU, you will need to ensure that you have iGPU enabled on your motherboard in the BIOS. If you set up your Unraid server using the onboard graphics, this should already be the case unless you plugged in a discrete graphics card. If you did, this probably isn’t the guide for you as you’d probably want to enable hardware encoding on that instead.
The first thing we will need to do is setup the driver for Quick Sync. Do this by launching your Unraid terminal using the first icon in the top right of your Unraid Web UI and typing in the following command:
modprobe i915Next, run the following 2 commands:
cd /dev/dri
ls
The output should look something like by-path/ card0 renderD128 and that means you’re good to go! Now we’ll need to change the permissions on these drivers in order to pass them through to our Plex Docker container. You can accomplish this by typing the following into your terminal:
chmod -R 777 /dev/driFinally we’ll need to modify Unraid’s GO file in order to persist these changes on reboot. To do that you’ll need to enter the following into your terminal:
nano /boot/config/goThe nano editor should popup, and you’ll need to navigate to the bottom and paste the two commands from earlier:
modprobe i915
chmod -R 777 /dev/dri
The resulting file should look something like this:
#!/bin/bash
# Start the Management Utility
/usr/local/sbin/emhttp &
modprobe i915
chmod -R 777 /dev/dri
To save it, press Ctrl X then Y then Enter.
Pass Through to the Docker container
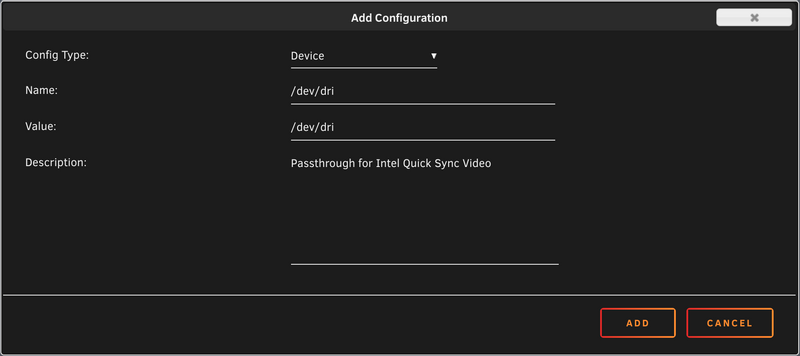
The next step is to pass through our Quick Sync device to our Plex Docker container. Navigate to the Docker tab in your Unraid Web UI, click on the icon for your Plex container, and click Edit. Scroll to the bottom and click Add another Path, Port, Variable, Label or Device. You’ll want to set the Config Type to Device and set both the Name and Value fields to /dev/dri.
Click Add to save the new variable and then click Apply at the bottom to save your container and restart it.
Enable Hardware Accelerated Streaming
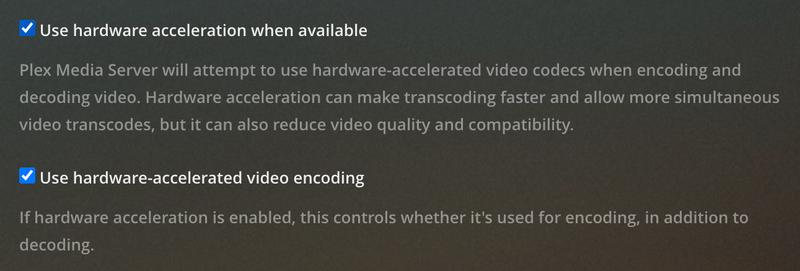
Finally, we’ll need to enable hardware acceleration in Plex. Launch your Plex app and head to the settings tab. In the sidebar under the Settings section, click Transcoder. Check the boxes next to both Use hardware acceleration when available and Use hardware-accelerated video encoding.
In order to test this, you’ll need to play some media, and make sure you’re converting it. Play any file on your server, and click on the settings icon in the bottom right, it should be the 4th icon in. Next to Quality select anything besides Original to start transcoding.
Next, minimize your video while it is still playing and navigate to your Dashboard. You can get here by clicking the first icon in the top right and clicking on Dashboard. Here you should see Now Playing with your current stream under it. If you have successfully enabled hardware acceleration you should see (hw) next to the video section of your stream.
If you have this then you’re done, you have successfully set up hardware accelerated streaming on your Plex server!
TL;DR
- Launch Unraid terminal
- Enter
modprobe i915 - Enter
chmod -R 777 /dev/dri - Enter
nano /boot/config/go - Add the following to the bottom of the file and save it:
modprobe i915
chmod -R 777 /dev/dri- Edit the Plex Container config.
- Add a new configuration of type Device with a Name and Value of
/dev/dri. - Save and restart the container.
- Navigate to the Transcoding section of the settings in your Plex web app.
- Check the boxes next to Use hardware acceleration when available and Use hardware-accelerated video encoding.
- Enjoy your Hardware-Accelerated Streaming!


